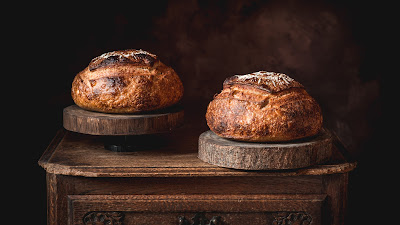
Today, I made a 40% kamut sourdough bread.
But what is kamut?
Kamut is an ancient grain thought to be a cousin of durum, with a grain that is at least twice the size of modern wheat. This grain comes with nice stories behind it and has many given names. In 1949, a US airman purchased 36 kernels from a vendor in Cairo who claimed to have taken them from a tomb of an ancient Egyptian king. He brought this grain to his father who had a farm and planted them. They called it King's Tut wheat but they had only small local success with it. It was just later in the 1990 that kamut became a commercial success after being trademarked to protect and guarantee that it would be grown organically and unmodified. Demand started to grow when people found kamut to be more easily digested and more flavoured compared to modern wheat varieties.
Although the last part of the story is certain, the origin of this grain is debatable as it is highly unlikely that wheat grains could sprout after 2000 years as the seeds' ability to germinate is almost lost during this time.
Another legend says that Noah brought this khorasan wheat with him on the ark, from where, another name for kamut is the “Prophet’s Wheat".
Also, the farmers in Turkey call the grain “Camel’s Tooth” because of its specific shape.
Kamut flour has a yellowish colour and tends to have higher water absorption. A dough made with it, forms good elasticity but is less well performing in extensibility, resulting in dough with less volume and denser texture.
Ingredients (1920g, 65.2% hydration):
- 400g kamut flour (or any favourite flour)
- 600g strong bread flour
- 600g water
- 300g sourdough starter
- 20g salt
- [Day 1, Saturday, 8:00] Scaling. I started by scaling the ingredients using a balance and put them on the table to ensure that nothing is forgotten.
- [Day 1 Saturday, 8:00] Mix water + flours. I mixed only the flour with water (slightly warmed up for 90 seconds in the microwave) until well combined. Do not knead at this stage, just ensure there is no unincorporated dry flour resting in the bowl and that's it. My kitchen is warm during the summer, I easily have 26ºC over the day. I then let it sit for 2 hours for the autolyse.
- [Day 1 Saturday, 10:00] Sourdough starter. I added the starter over the dough and mixed with a standing mixer for 10 minutes. After mixing, I let the dough relax for 1 hour.
- [Day 1 Saturday, 11:00] Salt. I added the salt and mix again for 5 minutes. Then, I let the dough relax again for 1 hour.
- [Day 1, Saturday, 12:00] Divide and Stretch and Fold. I took the dough out of the bowl put it on the slightly wet table board and divide it into 2. I did a few stretch and folds for each piece on the board and placed them in squared glass bowls. I let them sit covered for 1 hour.
- [Day 1, Saturday, 13:00] Lamination. I took each piece out of the bowl and did the lamination. I let the dough rest for 2 hours.
- [Day 1, Saturday, 15:00] Coil fold. I did half of a coil fold. Then I let them sit for 2 hours.
- [Day 1, Saturday, 17:00] Shape the loaves on the lightly floured board. I placed the dough face down into bannetons. Repeated the process for the second piece of dough. I covered the dough and let it sit at room temperature for another 2 hours. When well bumped, I placed them in the fridge overnight.
- [Day 2, Sunday, 9:00] Score. Before scoring, I preheated the oven to reach 270ºC. I reversed the bannetons on a peel and I did some decoration before scoring the,. Immediately after, I slid the loaves into the oven. Added some hot water to a tray under the baking stone to create steam.
- Baked at 270ºC for 15 minutes then reduced to 220ºC and continue for 20 minutes more.
- [Day 2, Sunday, 9:35] Cool. The bread needed to cool for at least 2 hours until it reaches room temperature. The cooking process continues slowly even after taking the bread out of the oven, so this is why it is important to not skip this step and to resist cutting it too early.
- [Day 2, Sunday, 11:35] Cut. Time to enjoy a slice of bread...


0 comments:
Post a Comment